Sprites & Tiles
There's a stark lack of content out there for using Unreal Engine 4's Paper2D system. If you do find content, it's primarily focused on side-scrolling platformers, like Super Mario Bros. or "Metroidvania" games.
Well, I grew up with Pokémon. And Zelda. Those delicious "top-down" views. Because of a childhood in the '90s and a Game Boy Pocket/Color/Advance in my hands in the back of the family car on road trips, I have an unhealthy nostalgia for this perspective and the 2D sprite-licious RPGs of Nintendo.
And I want to make one.
So, where to begin?
That'll work. That's a lot of little dudes. And a variety of color to use as well. Great for prototyping. Spriters-Resource is a good source, along with Open Game Art. Just check the license before you release anything. Obviously these Pokémon sprites are for prototyping only.
If you've got Unreal Engine 4 installed go ahead and make a new game (side note: I may breeze past the basics of Unreal Engine, as I'd rather focus more on specifics; so please check out their intro documentation, or take a course on Udemy or YouTube).
I used a totally blank Blueprint project. No starter content, nothing added. You can always add that stuff later if needed, and we can add C++ files later and dive into code when we want to. But for now, let's stick with Blueprints and a blank project.
Import your images by just dragging them into the content browser, and begin to build a file structure. Keep your stuff organized and start thinking of naming schemes now.
 |
| Click 'n drag your files in. |
I've seen a lot of Unreal Engine tutorials that use a prefix of the type of file for naming conventions. So "T_Characters" means it's a Texture. I'll be trying to stick to that. As you can see I also grabbed Pallet Town and Route 01 to use as a tileset. And obviously I've already done some other stuff, but ignore that for now. We're catching up.
Sprite Extraction
Right click any image you've imported and go to Sprite Actions > Apply Paper2D Texture Settings.
| Crisp and sharp pixels. |
This took me a little bit to find. Because when you just go ahead and Extract Sprites (as you can see in the menu there) you're going to end up with blurry compression. And we want all those sharp blocky pixels.
So once you've applied the Paper2D Texture Settings to your imported files, go ahead and hit Extract Sprites on the one which contains your character sprites.
So once you've applied the Paper2D Texture Settings to your imported files, go ahead and hit Extract Sprites on the one which contains your character sprites.
| Settings for 16-bit sprite sheet. |
Change the Sprite Extract Mode to "Grid" instead of "Auto." Then go to the Cell Width and Cell Height and set those to whatever resolution each individual sprite is. In my case, with these Pokémon Gold/Silver sprites they're 16x16. So that makes the yellow cookie-cutter lines perfect and aligned for extraction.
If you've got an odd sheet that has some margins or weird spacing issues, fiddle with those other settings to get the boxes to line up.
Hit "Extract" and wait for Unreal to do its magic. There's around four thousand sprites in this sheet. Grab some matcha green tea or something and re-energize. Tile sets are next.
Happy Little Trees
Alright, once the sprites are extracted go ahead and toss those into their own dedicated folder and do some cleanup work. Always do folder organization as you go. Don't let it pile up. Reorganize once you realize your original folder structure sucks. And then again when you realize your new organization also sucks. I'm always redoing how I have things organized. It's a good habit to be in.
Now that you're organized, right click the texture you're gonna use for your tile set. I stuck with a theme here, but you can do anything. Go to the same Sprite Actions and hit Create Tile Set this time. No need to extract anything. A tile set is just made. Double click the new tile set file.
 |
| Beautiful tiles! |
We're going to do something similar here as to what we did with sprites, but we're not cutting up the tile set into separate files. Instead, we're assigning properties to individual tiles within the tile set file.
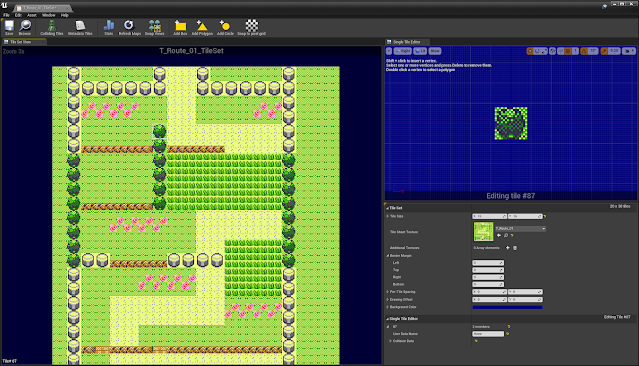
Click on a tile anywhere in the left Tile Set View panel. You'll see a preview of it in that blue-background tab called Single Tile Editor. I had to change the Tile Size setting to X 16 and Y 16 in order to hone in properly on this tree. It was defaulted to 32x32 so it grabbed too much stuff. Everything else looks good. Again, if you're having weird offset issues just tweak the settings under Border Margin to get things to line up.
Click on a tile anywhere in the left Tile Set View panel. You'll see a preview of it in that blue-background tab called Single Tile Editor. I had to change the Tile Size setting to X 16 and Y 16 in order to hone in properly on this tree. It was defaulted to 32x32 so it grabbed too much stuff. Everything else looks good. Again, if you're having weird offset issues just tweak the settings under Border Margin to get things to line up.
Setting Up Collision
This is also a point where we can add collision. Like this tree. We obviously aren't going to have our character walk on top of trees, or those weird cylinder fences (what the hell are those anyway?).
There are two ways of going about collision (that I know of). I'll explain the first way, and then I'll show you what I decided to do instead.
The first method is you can hit "Add Box" or "Add Polygon" or "Add Circle" and it will put a collider on that specific tile. You can hit "Colliding Tiles" to make them visible and see all the tiles with the new box/polygon/circle collider. This would make sense if we had a proper tile set texture, with only one instance of each unique tile, and not a picture of many repeating tiles ripped straight from a game. But since we have this fully created Route 01 picture, we don't really want to add collision to every single tile in there that needs it. Every tree, every weird cylinder fence, every short ledge. I mean, we could...and I did at first...but that felt clumsy and cluttered to me.
Instead, we're going to make a collision layer. And we'll find out if we encounter problems with this method later. Let's experiment, yeah?
I found this guy, Renn, on YouTube, and his tutorial here was perfect for getting this stuff started. You could just watch that video—and you should—but I'm going to keep explaining (because that's how this works).
Pick just one tile to be collision and add a Box to it. I like to use something that will be a collider anyway, such as one of those cylinders or a tree. Make sure you remember which tile you choose as your Golden-Boy-Collider-Tile.
Next, right click on your tile set in your Content Browser and click Create Tile Map at the top of the menu.
 |
| Let there be pixels. |
Name it something good. Like TM_Sandbox. This is going to be our playground where we make things in. That TM means Tile Map, so when you have hundreds of files later, you'll be able to just search for "TM_" and see them all. Again, stay organized.
Double-click your new tile map. You're ready to make a world.
Set your Map Width and Map Height in the details to make a nice canvas. Then click anywhere on the image to the left to choose a tile, and paint on the canvas. Use the fill bucket to dump something like grass on the entire map. You can also select multiple tiles and print an entire object, such as the house I used.
You'll want to set up some layers in the upper right, such as a Ground layer for your very bottom, and then a Lower and Upper layer for putting things on top of the ground (this tile set is a bad example for this because it doesn't have transparency, but if you had bushes or trees with transparency that you want to sit on top of grass or dirt, you'll want to put them on another layer...to layer them).
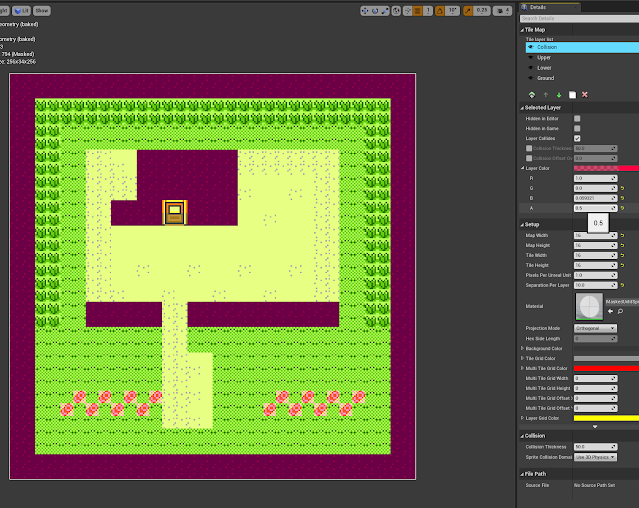
Next, to return to our subject on collision, make a Collision layer and put it on top of the others. Give the layer a color in the details panel—like a nasty purple—and set the alpha to 1 for now. Find and select your Golden-Boy-Collider-Tile from earlier in the left palette. Paint this over every spot that you want collision. See how I've put it around the perimeter, on the house, and the fences? Perfect. Now set the alpha to 0 so that it doesn't render.
 |
| Collision layer alpha set to 0. |
 |
| Collision layer alpha at 0.5. |
NOTE: I learned this when I packaged my game for a quick test. That "Hidden in Game" check box does not work. Either it means something else entirely, or it's bugged, but when I built and packaged a little test build of my game all my nasty purple collision was totally visible and rendered, even though it wasn't in the editor's game preview. I don't know why, but maybe they'll fix it someday. For now, my solution was to set the alpha of that layer to 0.
Make It Real
Once you've made your little sandbox, go back to your main tab with the level open and click and drag that tile map file into the viewer. You should see it come to life and floating there in 3D perspective mode. In the details panel I'd recommend setting the Location to 0, 0, 0. Keeps things neat and predictable when you've got a solid origin set.
 |
| 2D in 3D. |
Also, if you haven't done it, just delete everything else that was made by default in your level. You don't need anything. No lights, no atmospheric fog, no player start (yet), nothing. Just your fresh tile map floating in the void. This is your world.
If you rotate your view around you can see the tile map layers. I have the "Separation Per Layer" set to 10. This option can be found in your tile map under the Details > Setup tab.
Once we get a Hero spawning, they'll walk around on that top layer, and that happens to be our collision.
Let's conclude there before this gets too long. We'll tackle making the Hero next time, with animation and movement.
- Matthew


Comments
Post a Comment